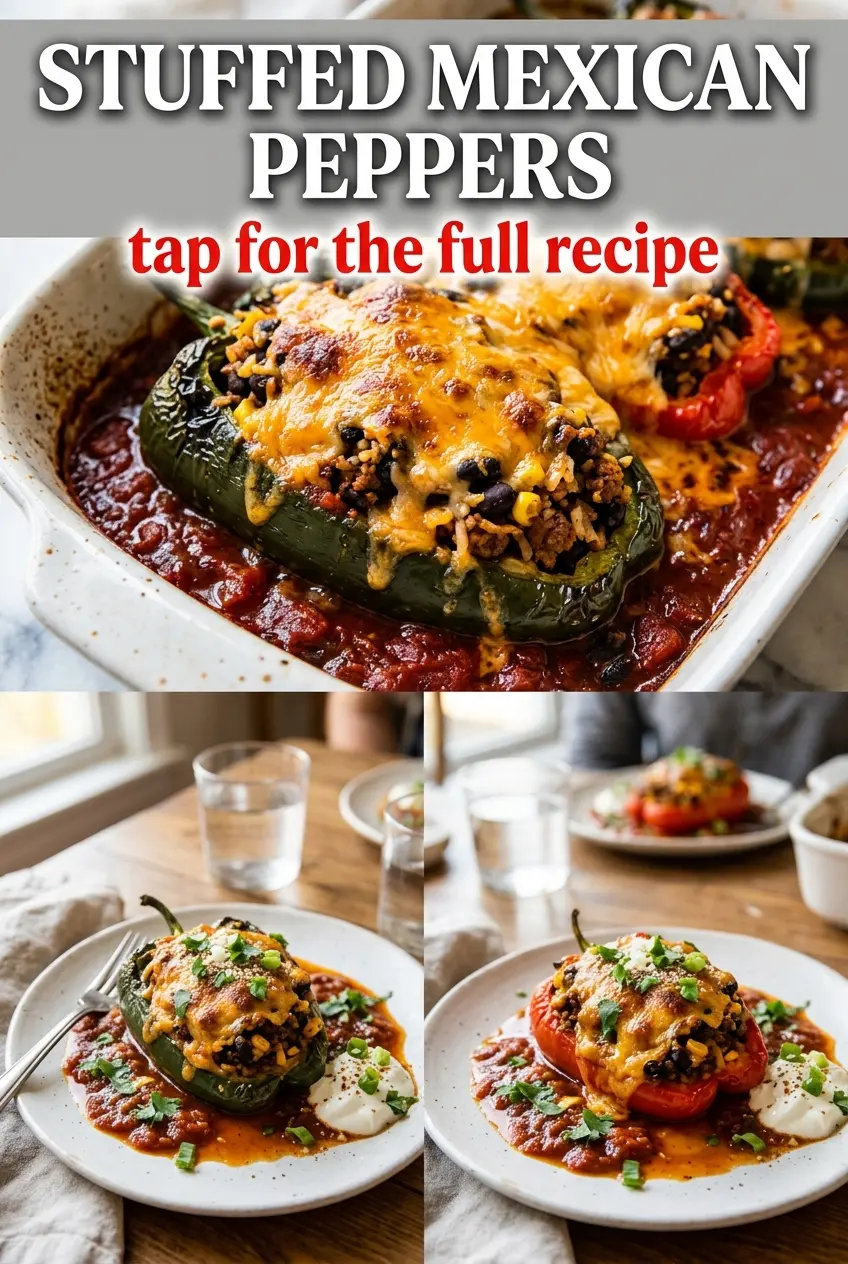
Mexican stuffed peppers work because the pepper itself becomes part of the filling instead of acting like a bland container. Roasting first softens the flesh, brings out a little sweetness, and adds that smoky edge that keeps every bite from tasting one-note. Once the peppers are peeled and steamed, they bake up tender enough to cut with a fork but still hold their shape on the plate.
The filling matters just as much as the peppers. Browning the beef with onion builds the base, and the salsa roja does more than add moisture — it seasons the rice, beans, and corn so the stuffing tastes cohesive instead of like separate ingredients piled together. A handful of cheese inside the mixture helps it bind, while the final layer on top gives you that melted finish everyone wants.
Below you’ll find the one step that makes stuffing peppers much easier, plus a few smart swaps if you want to use poblanos, bell peppers, or a meatless filling. The whole dish comes together with simple pantry ingredients, but the order you use them in changes the result.
The peppers held their shape beautifully and the filling stayed saucy instead of dry. I used bell peppers, and the salsa with the melted cheese on top made it taste like something I’d order at a restaurant.
Save these Mexican stuffed peppers for a dinner that brings smoky roasted peppers, saucy beef, and melted cheese together in one pan.
The Step Most People Rush: Roasting the Peppers Until the Skin Loosens
If the peppers never get fully charred, they stay stubborn and leathery after baking. That is the difference between a stuffed pepper that slices cleanly and one that fights you on the plate. You want the skin blistered almost everywhere, then you trap the heat in a bag so the steam lifts the skin right off.
The other trap is cutting too soon. Once the peppers steam, the flesh relaxes and the skin slips away more easily, but the pepper still needs enough structure to hold the filling. A careful slit down the side is better than cutting the top off if you want that upright, restaurant-style look.
- Charred skin — The blackened spots are doing the work here. They loosen after steaming and give the pepper a deeper roasted flavor.
- Plastic bag steam — Ten minutes is enough for the skin to separate without turning the pepper soggy.
- Careful slit — Slice just enough to open the pepper and remove seeds while keeping the shape intact.
What Each Ingredient Is Actually Doing in This Dish
- Poblano or bell peppers — Poblanos bring a mild smoky bite, while bell peppers are sweeter and a little larger. Either works, but poblanos give the more classic roasted flavor.
- Ground beef — This gives the filling body and richness. If you swap in ground turkey or chicken, add a little extra salsa or a spoonful of oil so the mixture doesn’t taste lean and dry.
- Cooked rice, black beans, and corn — This trio makes the filling hearty and keeps it from feeling like just taco meat stuffed into a vegetable. The rice absorbs the salsa, the beans hold their shape, and the corn adds pops of sweetness.
- Salsa roja — This is the easiest way to season the filling without measuring a long list of spices. A thick salsa works best because it clings to the meat and rice instead of pooling in the pan.
- Oaxaca or mozzarella cheese — Oaxaca melts with the best stretch, but mozzarella gets you close if that’s what you have. Use a good melting cheese here; a crumbly cheese will not give you that glossy top.
- Cilantro and tomato — These go in for freshness at the end. The tomato adds a little juiciness inside the filling, and the cilantro wakes everything up after the peppers come out of the oven.
Building the Filling So It Stays Moist, Not Watery
Cooking the Beef and Onion First
Start the filling by browning the beef with the onion until the meat loses its pink color and the onion turns soft and translucent. That step builds the savory base, and it also cooks off some of the moisture so the stuffing doesn’t turn soupy in the oven. Add the garlic at the end of this stage so it perfumes the pan without burning.
Turning the Pan into the Sauce
Once the rice, beans, corn, cheese, salsa, tomato, and cumin go in, the pan should look thick and spoonable, not loose. Simmer it for about five minutes so the salsa thickens and coats everything. If it still looks wet, give it another minute or two on the heat before stuffing the peppers, because extra liquid turns into a puddle under the cheese.
Filling and Baking
Pack the pepper shells generously, but don’t mash the filling so hard that the peppers split. Set them snugly in a baking dish so they support each other, then finish with the remaining cheese. Bake until the cheese melts and the edges of the peppers look tender but still hold their shape.
Three Practical Ways to Change This Recipe Without Losing What Makes It Good
Make It Vegetarian with Black Beans and Extra Corn
Skip the beef and double the black beans, then add an extra half cup of corn or diced zucchini for more texture. The filling will be lighter and a little softer, but the peppers still bake up with plenty of substance. Add a bit more cumin and salsa so the vegetarian version keeps the same bold seasoning.
Use Quinoa Instead of Rice
Quinoa works if you want a gluten-free swap with a little extra protein. It stays a touch firmer than rice, so the filling feels a bit more textured and less soft. Cook it first, then fold it in the same way you’d use rice so it can soak up the salsa without turning mushy.
Turn Up the Heat with Poblanos and Pepper Jack
If you want more kick, choose poblanos and swap part of the cheese for pepper Jack. The peppers stay mild compared with a jalapeño-heavy filling, but the finished dish gets a sharper, warmer finish. That’s the best version when you want a little heat without blowing out the balance of the dish.
Storage and Reheating
- Refrigerator: Store leftovers in an airtight container for up to 4 days. The peppers soften a little more as they sit, but the flavor gets even better.
- Freezer: Freeze the stuffed peppers after baking and cooling completely. Wrap each one tightly and freeze for up to 2 months; the texture softens after thawing, but they still reheat well.
- Reheating: Reheat covered in a 350°F oven until hot in the center, about 15 to 20 minutes. The common mistake is blasting them in the microwave so the cheese gets rubbery and the filling dries out before the middle warms through.
Answers to the Questions Worth Asking
Mexican Stuffed Peppers
Ingredients
Equipment
Method
- Roast the poblano or bell peppers directly over a gas flame or under the broiler until charred all over, about 5 minutes, turning as needed for even blistering (visual cue: blackened, blistered skin).
- Place the charred peppers in a plastic bag for 10 minutes to steam (visual cue: skins loosen and look slightly softened).
- Peel off the charred skin carefully and keep the peppers intact (visual cue: smooth, roasted green/red pepper flesh).
- Make a careful slit down the side and gently remove seeds, keeping the pepper intact (visual cue: an open cavity for stuffing).
- Brown the ground beef with the diced onion in a large skillet over medium-high heat until the beef is no longer pink (visual cue: beef browned and onion softened).
- Add the minced garlic and cook for 1 minute, stirring, until fragrant (visual cue: garlic smell released and slight browning at edges).
- Stir in the cooked rice, black beans, corn, 1/2 cup cheese, salsa, diced tomato, cumin, salt, and pepper (visual cue: mixture evenly coated and cohesive).
- Simmer the mixture for 5 minutes until heated through (visual cue: bubbling gently and flavors combined).
- Stuff each roasted pepper with the meat mixture and place them in a baking dish (visual cue: peppers filled nearly to the top).
- Top with the remaining cheese (visual cue: a thick layer of cheese over each pepper).
- Bake at 350°F for 20 minutes until the cheese is melted and hot throughout (visual cue: melted, lightly browned cheese).
- Garnish with the chopped cilantro before serving (visual cue: bright green flecks on top).


