Seven Layer Taco Dip earns its place on a party table because it hits all the right notes at once: creamy, salty, tangy, crunchy, and bright. The layers stay distinct long enough to look impressive in a glass dish, but the first scoop pulls everything together into a bite that tastes like nachos without the oven. It’s the kind of appetizer that disappears fast because people keep going back for “one more chip.”
The trick is building the dip in a stable order so the bottom layers can carry the weight of the toppings above them. Thick refried beans hold the base, the sour cream gets seasoned before it goes on, and the cheese sits between the creamy layers and the wet toppings to keep things from getting soggy too quickly. That small bit of structure is what makes this version work for a crowd.
Below, you’ll find the layering order that keeps each bite balanced, plus a few smart swaps if you want to lighten it up or make it ahead for a party. There’s also a storage note worth knowing if you end up with leftovers, though honestly, that’s not usually the problem.
The sour cream layer was perfectly seasoned and the dip held its layers all through game night. I made it in a clear dish and it looked just like the photo when it hit the table.
Save this seven layer taco dip for parties when you want a bold, colorful appetizer that stacks cleanly and scoops beautifully.
The Layer Order That Keeps the Dip from Turning Soupy
The main thing people get wrong with layered taco dip is treating every layer like it behaves the same. It doesn’t. Refried beans are sturdy, but tomatoes and olives carry a lot of moisture, and if they go too low in the dish, they bleed into the creamy layers fast. Keeping the cheese between the sour cream and the wetter toppings gives the dip a little insulation, which helps the base stay scoopable instead of collapsing into a soft puddle.
The other detail that matters is thickness. Spread each layer all the way to the edges and keep it even, but don’t mash everything flat. A little texture in the bean layer helps the chips grab onto it, and a light hand with the tomatoes keeps the top from getting watery before the bowl is empty.
What the Ingredients Are Doing in Each Layer
The ingredients here are simple, but they each have a job. The beans anchor the whole dish, the seasoned sour cream turns the middle layer into something tangy instead of plain, and the cheese gives the dip a savory buffer between creamy and fresh ingredients. The toppings at the end aren’t just garnish; they add color, crunch, and the bright finish that keeps the dip from tasting heavy.
- Refried beans — Use a thick, smooth style here. If they seem stiff straight from the can, stir in a spoonful of water or a little salsa just until they spread easily. Thin beans make the whole dish slump.
- Sour cream — Full-fat sour cream gives the cleanest texture and the best hold. Light sour cream works, but it can loosen a bit faster after sitting. If you want a sharper bite, use Mexican crema or a half-and-half mix of sour cream and plain Greek yogurt.
- Taco seasoning — A packet is the easiest route because the salt, cumin, garlic, and chili powder are already balanced. If you make your own, season the sour cream lightly first, then taste it before spreading; it should taste a touch bold on its own because the beans mute it.
- Cheddar cheese — Shred it yourself if you can. Pre-shredded cheese is coated to prevent clumping, which also keeps it from melting into the sour cream layer as smoothly. Sharp cheddar gives the most flavor with the least effort.
- Tomatoes, olives, green onions, and cilantro — Drain everything well. The vegetables should look dry on the surface before they go on the dip. If your tomatoes are especially juicy, seed them first or the top will weep after an hour or two.
Building the Layers So They Hold Their Shape
Starting with a Solid Bean Base
Spread the refried beans in an even layer across the bottom of a 9×13-inch dish. A rubber spatula works better than the back of a spoon because it lets you push the beans into the corners without dragging them back up. If the beans are cold and stiff, they’ll tear the layer underneath later, so stir them first until they loosen and spread smoothly.
Seasoning the Cream Layer
Mix the sour cream and taco seasoning until the color is uniform and there are no streaks left. That step matters more than it looks because pockets of dry seasoning can taste harsh and salty in one bite and bland in the next. Spread it gently over the beans so the two layers stay distinct; if you press too hard, the beans will lift and muddy the middle.
Adding the Toppings Without Flooding the Top
Sprinkle the cheese over the sour cream before adding the tomatoes and olives. The cheese acts like a barrier, and once it’s down, the wetter toppings have less chance to sink. Finish with the green onions and cilantro just before serving so they stay bright and fresh. If you’re making the dip ahead, hold the herbs until the last minute or they’ll darken and wilt.
How to Adapt It for a Crowd, a Shortcut, or a Lighter Bowl
Make-ahead party dip
Assemble the beans, seasoned sour cream, cheese, tomatoes, and olives up to 24 hours ahead, then cover and chill. Save the green onions and cilantro for just before serving so the top stays fresh. The dip firms up in the fridge, which actually helps it scoop cleaner.
Lighter version with Greek yogurt
Swap some or all of the sour cream for plain Greek yogurt. The dip turns tangier and a little firmer, which is nice if you want something less rich, but it won’t have the same soft, classic taco-dip flavor. Use full-fat yogurt if you want the closest texture.
Gluten-free by ingredient check
This dip is naturally close to gluten-free, but taco seasoning packets vary. Check the label on the seasoning and the refried beans before using them, since some brands include thickeners or flavorings that aren’t always obvious. Serve with certified gluten-free tortilla chips if needed.
Extra-salty, extra-bold version
If you like a punchier dip, add a spoonful of salsa or a little minced pickled jalapeño to the sour cream layer. That gives the center more heat and acid, but it also loosens the layer slightly, so keep the addition small. The result tastes brighter and a little closer to restaurant-style taco dip.
Storage and Reheating
- Refrigerator: Store covered for up to 3 days. The tomatoes and herbs soften over time, but the flavor stays good.
- Freezer: This doesn’t freeze well. The sour cream and fresh toppings separate and turn watery after thawing.
- Reheating: Don’t reheat this dip. Serve it cold straight from the fridge, and if it has been sitting out for a while, give it a quick stir around the edges where moisture collects.
Answers to the Questions Worth Asking
Seven Layer Taco Dip
Ingredients
Method
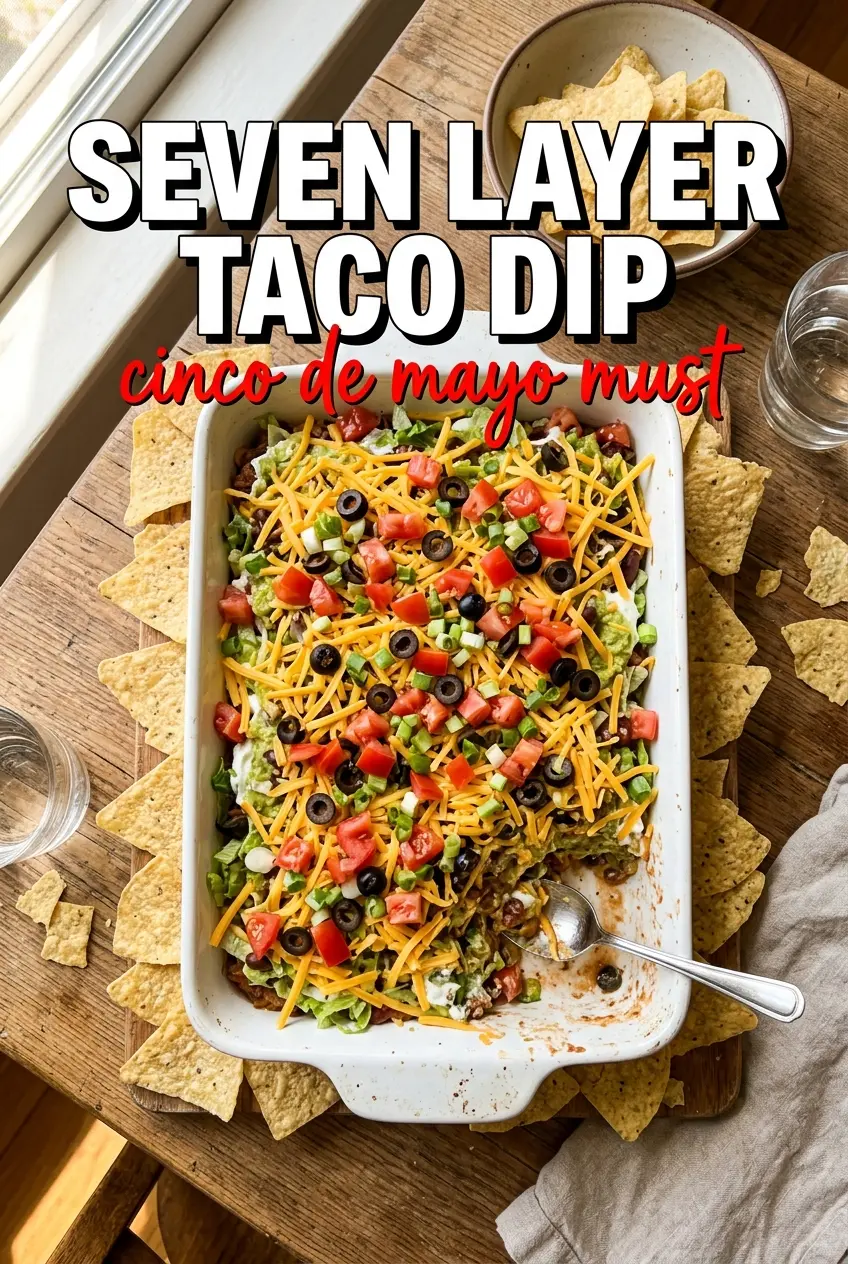
- Spread the refried beans evenly in the bottom of a 9x13 inch baking dish as the first layer, making the surface smooth so the dip sets into even bands.
- Mix the sour cream and taco seasoning until fully combined, then spread this mixture over the beans as the second layer with an even thickness.
- Sprinkle the shredded cheddar cheese over the sour cream layer so it fully covers and creates a solid, melty-looking middle.
- Add a layer of diced tomatoes over the cheese, distributing them to the edges so each scoop shows tomato pieces.
- Layer the drained sliced black olives over the tomatoes in an even scatter for pops of dark color.
- Top with diced green onions and fresh cilantro just before serving to keep the herbs bright and the layers clearly defined.
- Serve the seven layer taco dip with tortilla chips on the side for scooping.


