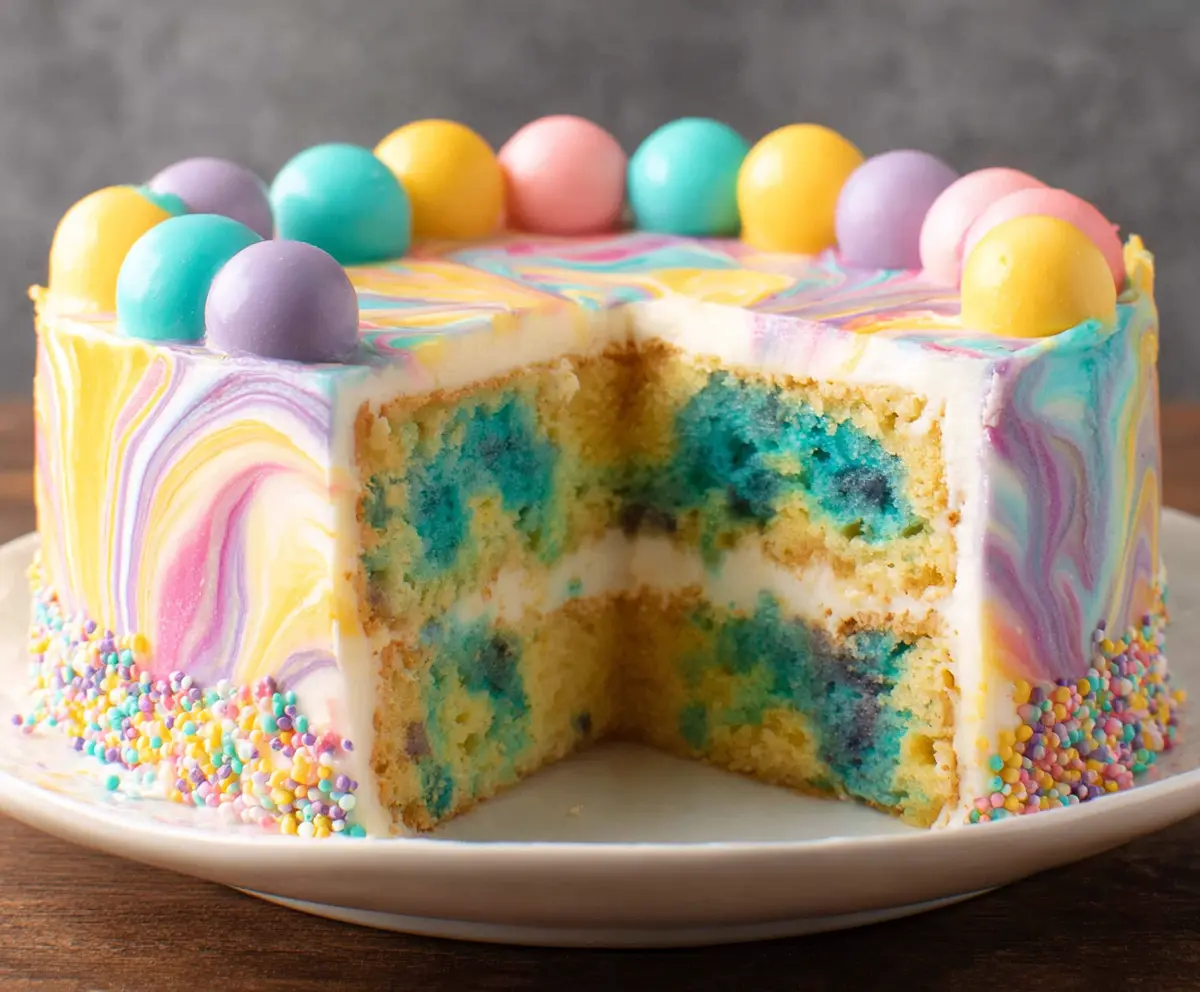
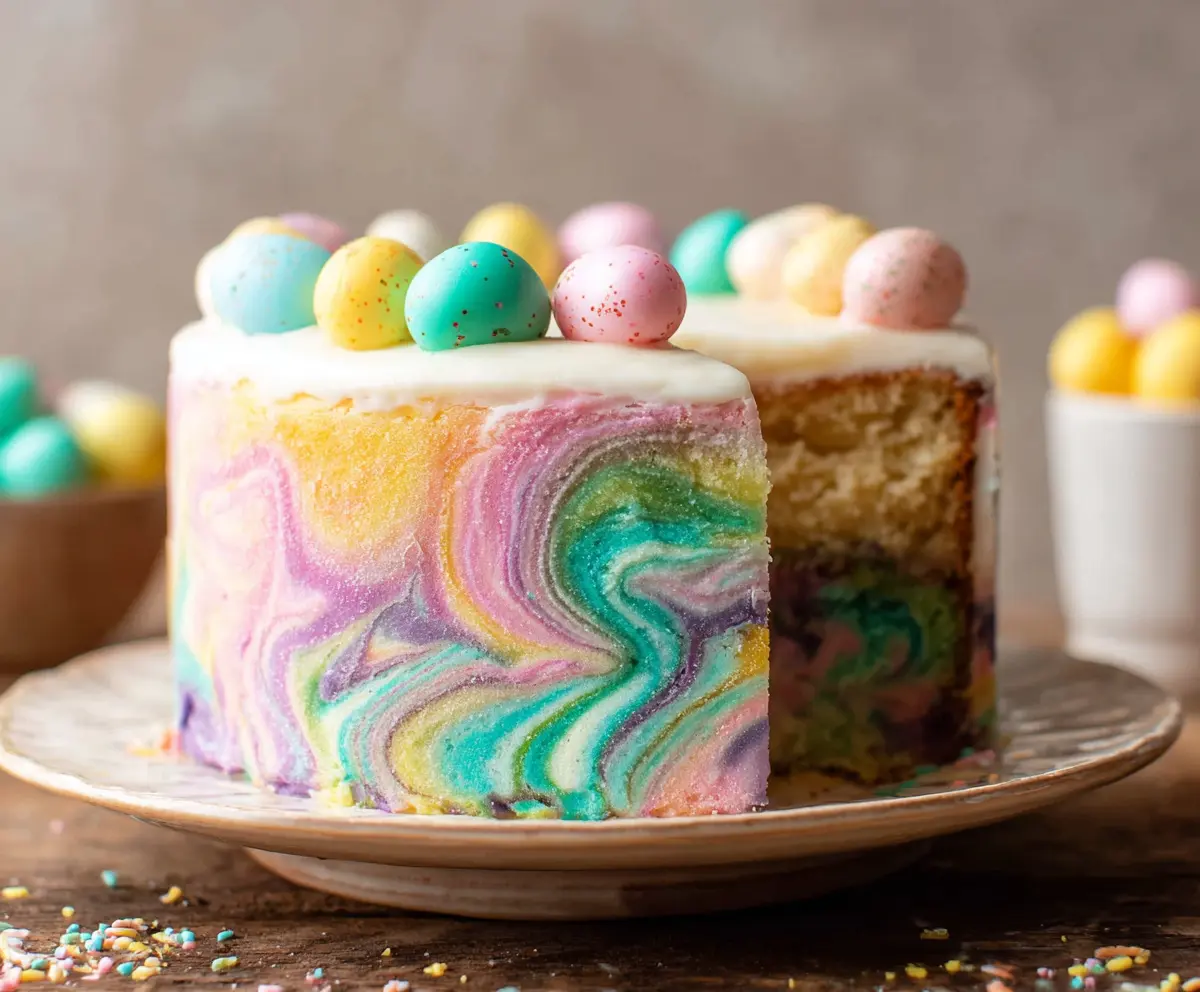
This Swirled Easter Cake is a fun and colorful treat! With its soft layers of fluffy cake and bright swirls of icing, it’s perfect for any spring celebration.
Baking this cake always brings me joy. I love watching the swirls form and the smiles it brings when I serve it. It’s like spring on a plate! 🌸
Key Ingredients & Substitutions
All-Purpose Flour: This provides structure to your cake. If you need a gluten-free option, you can swap it with a gluten-free flour blend, just ensure it’s a 1:1 substitute.
Unsalted Butter: I love using unsalted butter for better control over salt levels. If you’re dairy-free, try using margarine or a non-dairy butter alternative.
Granulated Sugar: This adds sweetness and helps with texture. If you prefer a lower sugar option, consider using coconut sugar—just know the texture will vary slightly.
Food Coloring: Gel food coloring gives vibrant shades without affecting batter texture. If you run out, use liquid, just adjust the quantity slightly to avoid adding too much liquid.
Heavy Cream: It helps create a creamy frosting. If you want a lighter option, use milk or a dairy-free milk alternative. The frosting might be a bit less rich, but still tasty!
How to Get the Perfect Swirl Effect?
Creating that stunning marbled look is both fun and easy! Here’s how to do it:
- Start with four bowls of colored batter. Use a knife or skewer to gently swirl the colors together in each pan.
- Don’t overmix! Aim for a light swirl to keep colors distinct and vibrant—too much mixing will result in a blended, muddy look.
- Pour the swirled batter into the pans, careful not to disturb the designs too much. The key is to keep it as colorful as possible!
Remember, this is all about being vibrant and playful, so don’t stress it too much. Enjoy the process!
How to Make a Delightful Swirled Easter Cake
Ingredients You’ll Need:
For the Cake:
- 2 1/2 cups all-purpose flour
- 2 1/2 teaspoons baking powder
- 1/2 teaspoon salt
- 1 cup unsalted butter, softened
- 2 cups granulated sugar
- 4 large eggs
- 1 tablespoon vanilla extract
- 1 cup whole milk
- Food coloring (blue, yellow, purple, pink) – gel or liquid
For the Buttercream Frosting:
- 1 cup unsalted butter, softened
- 4 cups powdered sugar, sifted
- 1/4 cup heavy cream or milk
- 2 teaspoons vanilla extract
- Pinch of salt
- Food coloring (blue, yellow, purple, pink) for swirling effect
For Decoration:
- Small round candy spheres in pastel colors (yellow, purple, pink, blue)
- Multi-colored pastel sprinkles
How Much Time Will You Need?
You’ll need about 30 minutes for preparation, plus another 30-35 minutes for baking. Don’t forget to let the cake cool for about 10 minutes before transferring it to a wire rack, and then an additional 30 minutes in the fridge once frosted to set everything. So, plan for about 1.5 hours in total plus cooling time!
Step-by-Step Instructions:
1. Prepare the Cake Batter:
Start by preheating the oven to 350°F (175°C). Make sure to grease and flour your two 8-inch round cake pans so they don’t stick! In a medium bowl, sift together the flour, baking powder, and salt—this helps everything mix well. In a large mixing bowl, beat together the softened butter and sugar until it’s light and fluffy, this should take about 4-5 minutes. Then, add the eggs one at a time, making sure to mix well after each addition. Stir in the vanilla extract next. Now, alternate adding the dry ingredients and the milk to your batter, starting and ending with the dry ingredients, mixing just until combined. Don’t overmix!
2. Coloring the Batter:
Now it’s time to make it colorful! Divide the batter evenly into four small bowls. Color each bowl with a different food dye (blue, yellow, purple, pink). When you’re ready, pour the colored batters into the prepared cake pans. Use a knife or skewer to lightly swirl them together to create a beautiful marbled effect. Just remember, less is more here; don’t go overboard with mixing!
3. Bake the Cake Layers:
Pour the swirled batter into your cake pans and place them in the oven. Bake for 30-35 minutes. To check if they’re done, insert a toothpick in the center of each cake; if it comes out clean, they’re ready! After baking, let the cakes cool in the pans for about 10 minutes before transferring them to a wire rack to cool completely.
4. Prepare the Buttercream Frosting:
While the cakes cool, let’s make the frosting! Beat your softened butter on medium speed until creamy. Gradually add the powdered sugar, about a cup at a time, and mix well after each addition. Then, add the vanilla extract, salt, and the heavy cream (or milk), continuing to beat until everything is light and fluffy. Divide this frosting into four bowls and tint each with a small amount of food coloring to match your cake colors.
5. Create Swirled Frosting:
To make your frosting look as swirly as the cake, place all the different colors of frosting side by side in a bowl. You can also spread them in stripes on a palette knife. Using a skewer or knife, lightly swirl the colors together to create a lovely marbled effect!
6. Assemble the Cake:
Once your cake layers are completely cool, you might want to level them off with a knife if they have domed a bit. Start by placing one cake layer on a serving plate and frost the top with either white or a lightly swirled layer of buttercream. Carefully place the second cake layer on top. Now, frost the entire outside of the cake with your swirled buttercream, using a spatula or offset knife to smooth it out.
7. Decorate:
It’s time to get festive! Press colorful sprinkles along the bottom edge of the cake for a pop of color. Then arrange the pastel candy spheres around the top edge of the cake for some added fun and brightness!
8. Chill and Serve:
To finish up, refrigerate your cake for about 30 minutes to set the frosting. When you’re ready to serve, take it out and let it come to room temperature for the best flavor and texture. Enjoy the vibrant and festive Swirled Easter Cake with friends and family!
Can I Use Different Food Colors for the Cake?
Absolutely! Feel free to get creative with any food coloring you like. Just remember that gel colors will provide more vibrant results compared to liquid food dyes.
Can I Make This Cake Ahead of Time?
Yes, you can! You can bake the cake layers a day ahead. Just wrap them tightly in plastic wrap once they’re completely cooled, and store them at room temperature. Assemble and frost the cake on the day you plan to serve it for the freshest taste!
How Should I Store Leftovers?
Store leftover cake in an airtight container in the refrigerator for up to 3-4 days. If you want to keep it for longer, you can freeze slices wrapped in plastic wrap, then aluminum foil, for up to 3 months. Thaw in the fridge before enjoying!
What Can I Use Instead of Heavy Cream in the Frosting?
If you don’t have heavy cream on hand, you can substitute it with milk or a dairy-free alternative. Just remember that the frosting may be slightly less rich, but it will still be delicious!