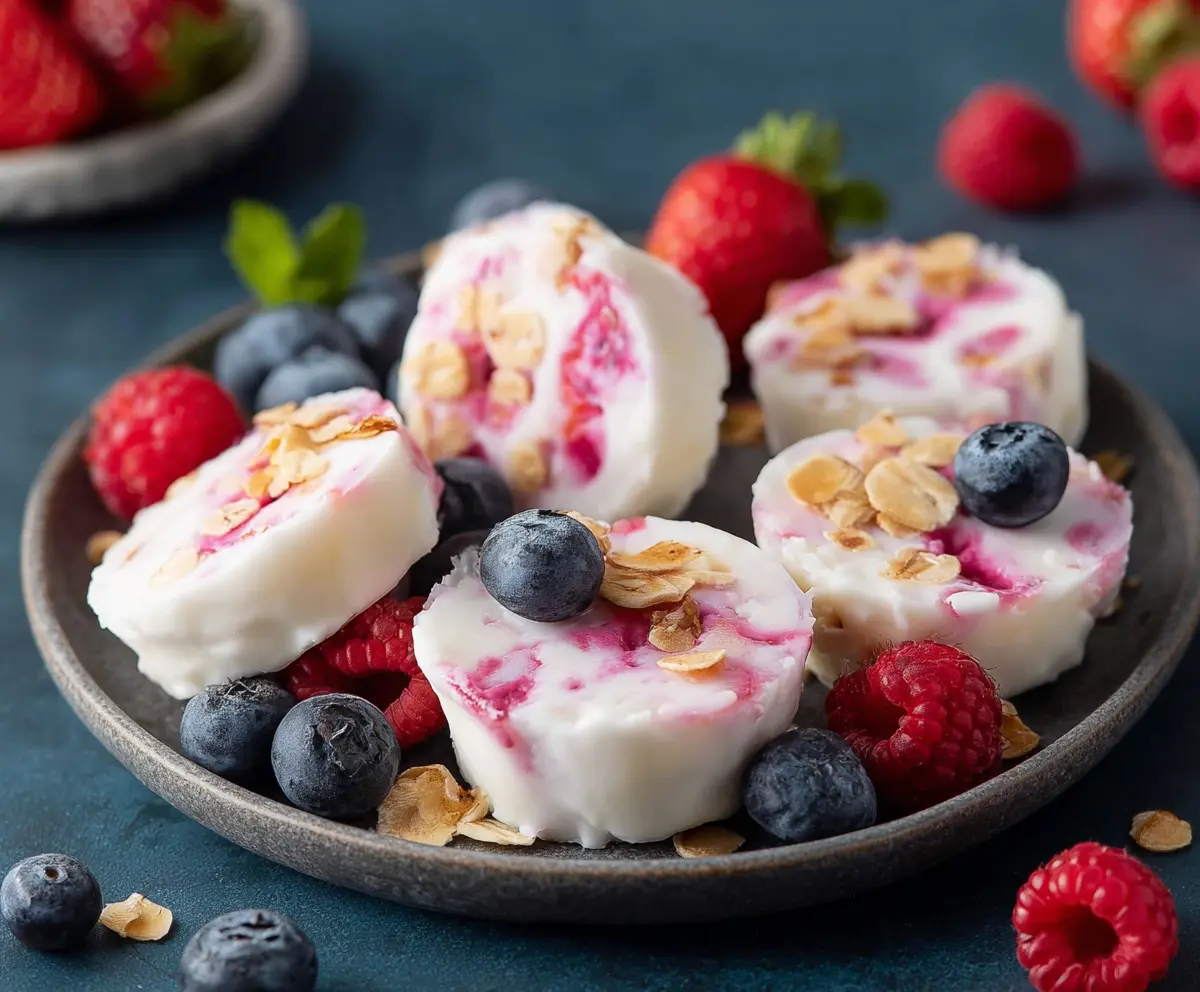
These Frozen Yogurt Bites are a tasty and healthy treat perfect for hot days! Just mix yogurt with your favorite fruits, freeze them in molds, and voila—quick and yummy snacks!
I love how easy they are to make, plus you can mix and match flavors! Perfect for sharing, but don’t be surprised if you eat them all by yourself! 😂
Key Ingredients & Substitutions
Greek Yogurt: Choose plain Greek yogurt for a thick consistency and more protein. If you prefer a sweeter flavor, vanilla yogurt is a lovely option. You can use non-dairy yogurt too if you’re vegan or lactose intolerant!
Mixed Fresh Berries: I love adding raspberries, blueberries, and strawberries for color and flavor, but you can mix it up with blackberries or chopped bananas if berries aren’t available.
Granola: Opt for your favorite granola; just check the ingredients for added sugars. You can also use crushed nuts or cereal for a different crunch if you don’t have granola on hand.
Honey or Maple Syrup: This is optional but gives a touch of sweetness! Agave syrup can substitute for honey if you’re looking for a vegan-friendly option.
How Do You Make Sure the Yogurt Bites Come Out Easily?
Getting your yogurt bites out of the molds can be tricky! Here’s how to make it easy:
- Use silicone molds: They allow for easier removal than metal or plastic.
- Lightly spray with cooking spray: Just a quick spray will help them slide out smoothly.
- Freeze until solid: Wait for at least 4 hours or until the yogurt is completely frozen.
- Let them sit a minute at room temperature: If you’re having trouble, leaving them out for just a minute can help loosen them.
This way, you’ll have perfect little bites every time! Enjoy the refreshing pops of flavor as a quick snack or dessert.
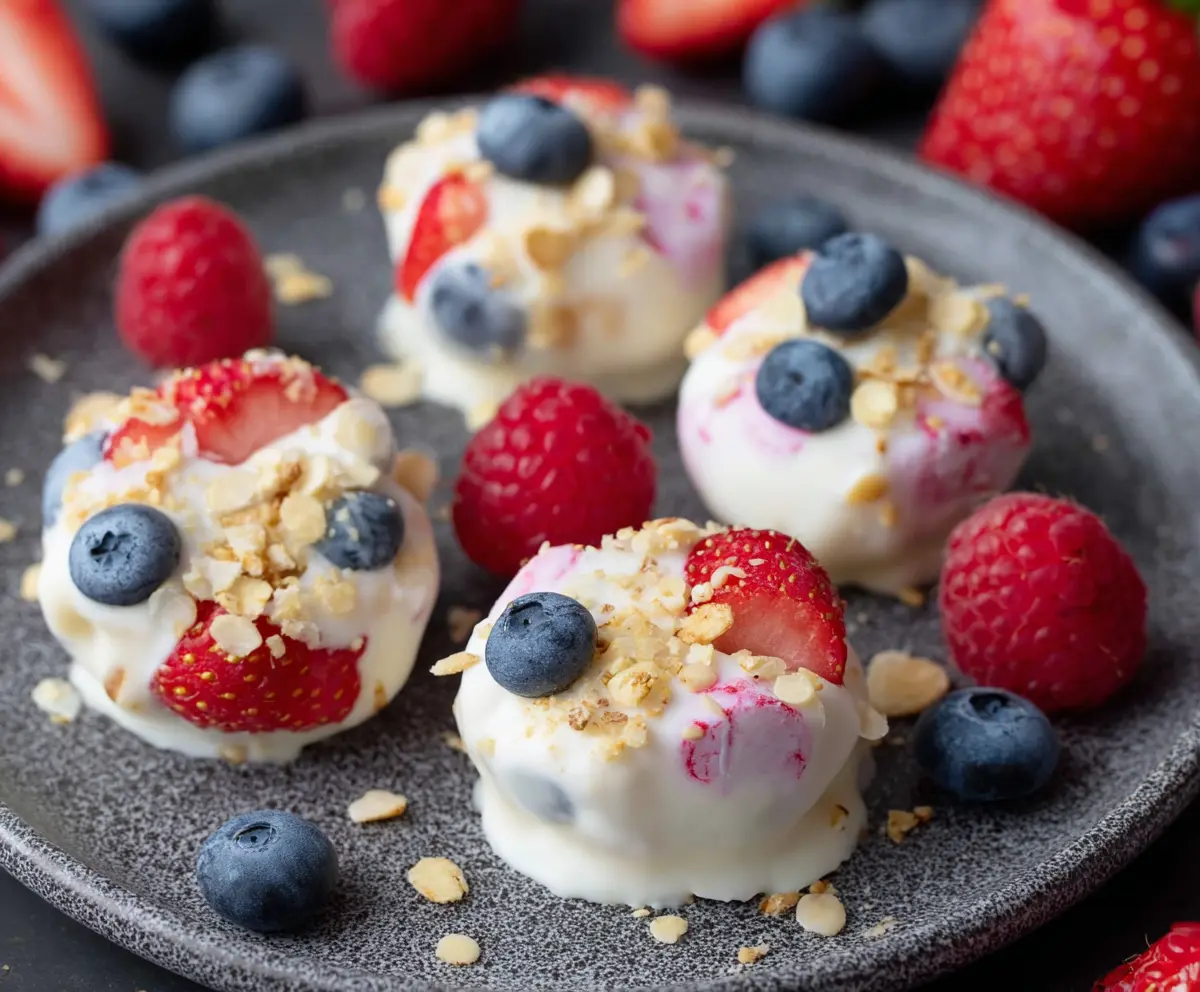
How to Make Frozen Yogurt Bites with Berries and Granola
Ingredients You’ll Need:
For the Frozen Yogurt Base:
- 2 cups plain Greek yogurt (or vanilla yogurt)
- 1-2 tbsp honey or maple syrup (optional, for sweetness)
For the Mix-Ins:
- 1 cup mixed fresh berries (raspberries, blueberries, strawberries), chopped if large
- 1/2 cup granola (toasted oats and nuts)
For Garnishing:
- Additional fresh berries, for garnish
How Much Time Will You Need?
This delicious treat requires about 15 minutes of prep time, plus at least 4 hours to freeze. So, you’ll need a little patience, but the result is worth the wait!
Step-by-Step Instructions:
1. Mix the Yogurt:
Start by taking a medium mixing bowl and adding the plain Greek yogurt. If you like your yogurt a bit sweeter, mix in 1 to 2 tablespoons of honey or maple syrup. Stir gently until it’s smooth and well combined.
2. Fold in the Berries:
Next, add half of your assorted chopped berries to the yogurt mixture. Use a spatula to fold them in softly, so you don’t mash the berries too much.
3. Prepare the Molds:
Grab a silicone muffin tray or small ice cube molds—these work best! Lightly spray them with cooking spray or, if you prefer, line them with parchment paper for easy removal later.
4. Fill the Molds:
Spoon the yogurt and berry mixture into the molds, filling each one about 3/4 full. Don’t worry if it’s a bit messy—those little imperfections will be beautiful once frozen!
5. Add Granola On Top:
Now, sprinkle a layer of granola over each filled mold. Gently press it down into the yogurt so it sticks, creating that lovely crunchy top.
6. Garnish with More Berries:
Take the remaining berries and drop a few on top of the granola. You can gently push them into the yogurt to make them stick better.
7. Swirl for a Marbled Effect:
If you’re feeling creative, use a small spoon or a toothpick to create a subtle swirl with the berries in the yogurt. This adds a fun touch to your bites!
8. Freeze the Bites:
Pop your molds into the freezer and let them freeze for at least 4 hours or until they are completely firm. It’s the waiting game now!
9. Serve and Enjoy:
When you’re ready to eat, gently pop the yogurt bites out of the molds. If you’re having trouble, leave them at room temperature for a minute to make it easier.
10. Garnish and Savor:
Arrange the frozen yogurt bites on a serving plate and add some extra fresh berries for a beautiful finish. Now, it’s time to enjoy these refreshing bites straight from the freezer!
These Frozen Yogurt Bites are perfect for a healthy snack, and they combine creamy, fruity, and crunchy textures that are just delightful! Enjoy your homemade treat!
Can I Use Dairy-Free Yogurt for This Recipe?
Absolutely! You can substitute plain or vanilla dairy-free yogurt (like almond, coconut, or soy yogurt) to make these bites vegan-friendly. Just ensure it has a similar consistency to Greek yogurt for the best results.
What Other Mix-Ins Can I Use?
Feel free to get creative! You can add chopped nuts, seeds, or even different fruits like kiwi or mango. Just remember to keep the total amount similar to the original recipe for proper consistency.
How Long Can I Store These Frozen Yogurt Bites?
You can store them in an airtight container in the freezer for up to 2 months. Just make sure to separate layers with parchment paper to avoid sticking together!
Can I Thaw These Yogurt Bites Before Serving?
Yes, you can let them sit at room temperature for a few minutes to soften slightly. This will make them easier to bite into while still enjoying that icy freshness!