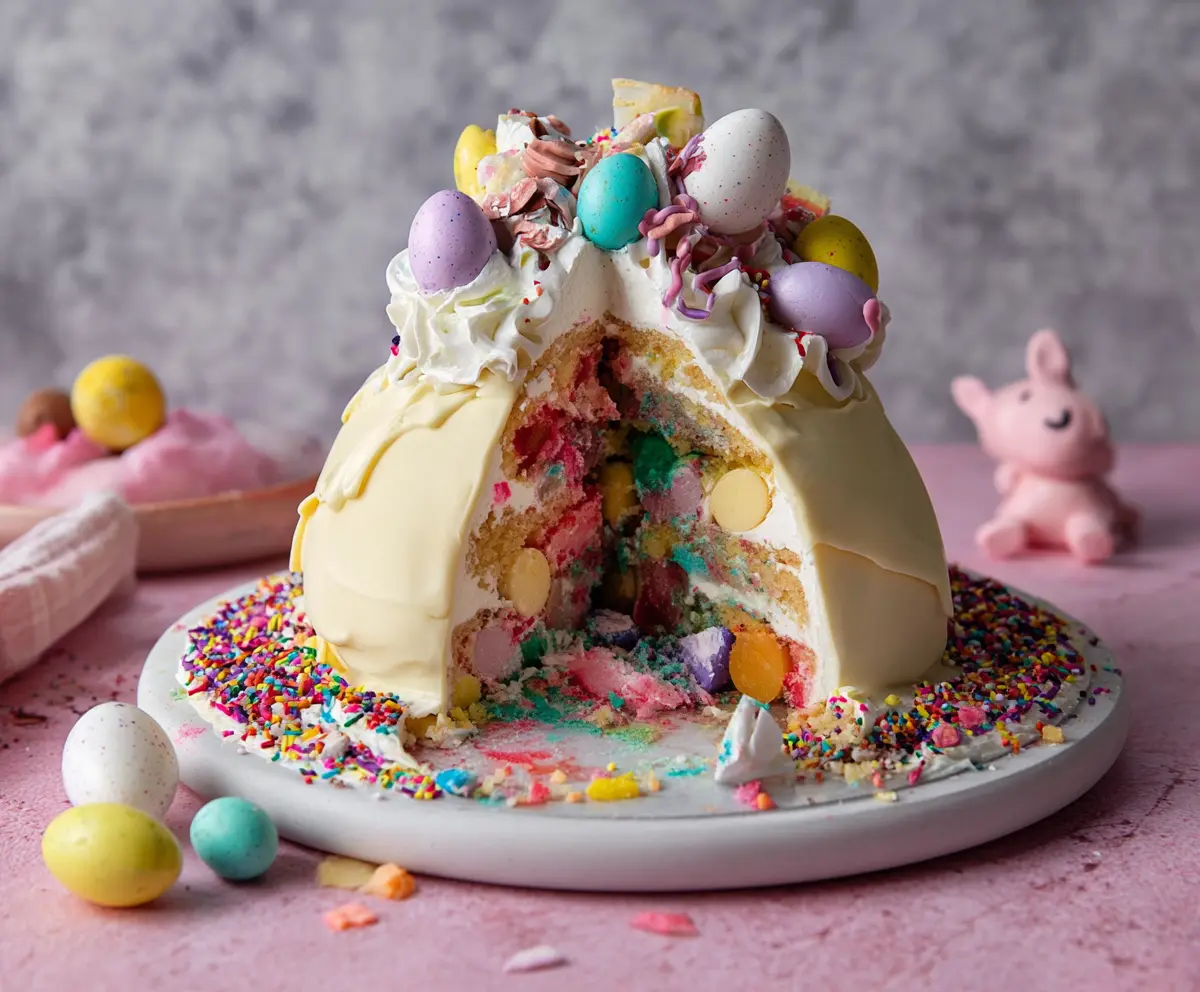
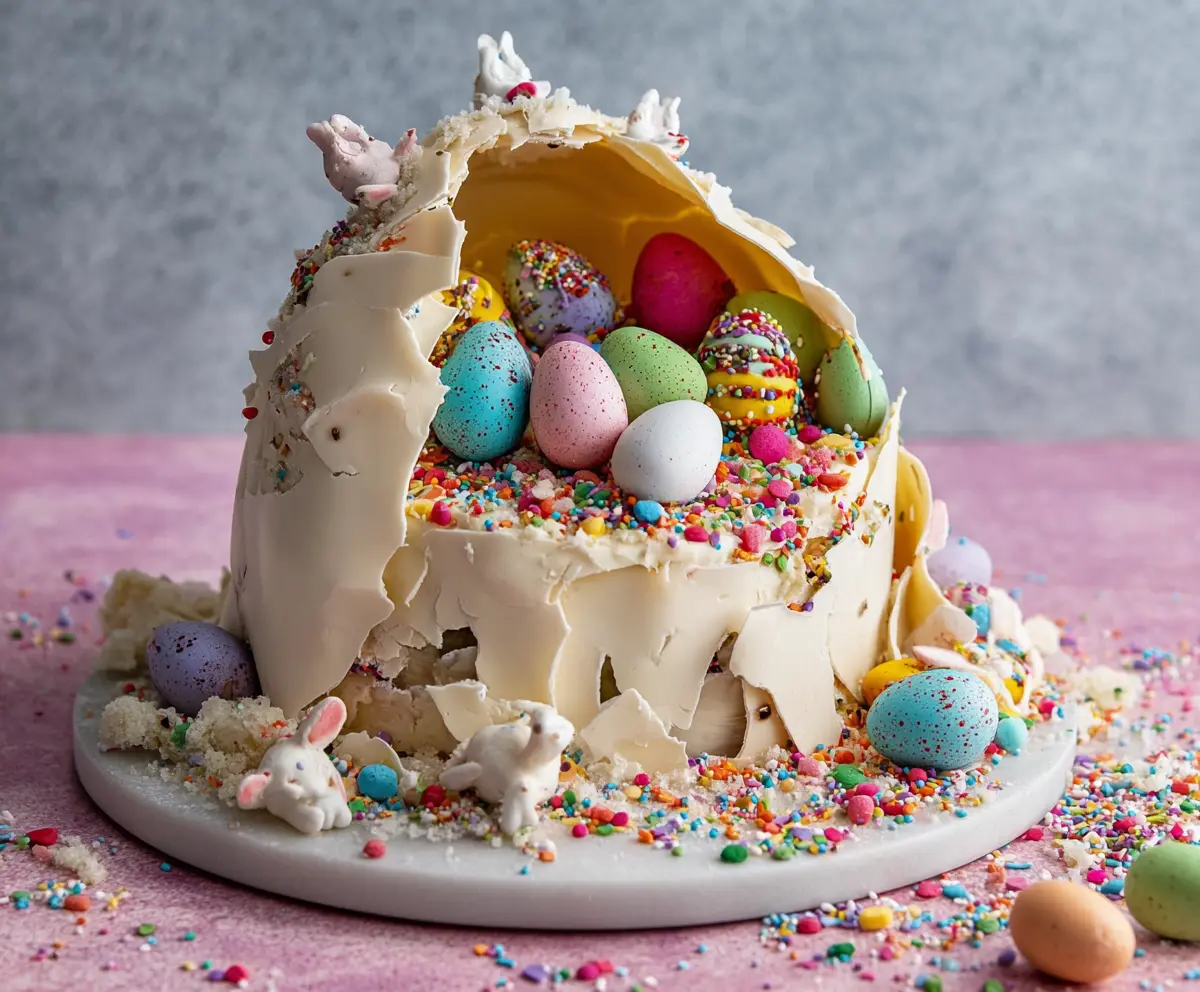
This fun Easter Egg Smash Cake is a treat for both the eyes and taste buds! It’s a delicious chocolate cake filled with colorful candy eggs waiting to be smashed open.
I love the surprise inside! When you crack that cake open, it’s a party of candy! Perfect for the kids (and the kid inside all of us) to enjoy. 🎉 Who doesn’t love a good smash, right?
Key Ingredients & Substitutions
All-Purpose Flour: This is the backbone of the cake. If you’re looking for a gluten-free option, consider almond flour or a gluten-free all-purpose blend, though the texture will vary.
Butter: I always use unsalted butter for more control over the salt content. If you need a dairy-free option, try using margarine or coconut oil, but keep an eye on the cake’s flavor.
Heavy Cream: This is crucial for making fluffy whipped cream. If you’re cutting down on fat, you can substitute half-and-half, but it won’t whip up as well. Silken tofu blended can also work for a vegan option!
Candy-Coated Chocolate Eggs: While Cadbury Mini Eggs are delightful, you could use any pastel chocolate candies or even homemade chocolate-covered nuts for a different treat.
Food Coloring: Gel food coloring provides vibrant colors without altering the batter’s consistency much. Liquid dyes can work, but the colors may not be as bright.
How Do I Get the Cake Layers to Bake Evenly?
Baking cake layers evenly is essential for a level cake. Here’s how to do it:
- **Preheat your oven:** Make sure your oven is preheated to 350°F (175°C) before baking.
- **Use room temperature ingredients:** This helps the batter mix more evenly.
- **Use the right pans:** Make sure your cake pans are the same size and material, as this affects how heat is distributed.
- **Grease and flour your pans well:** This prevents the cakes from sticking.
- **Check the doneness early:** Start checking for doneness a few minutes before the recommended time. A toothpick inserted into the center should come out clean.
Taking these steps can help ensure that your cake layers rise and bake uniformly, leading to a beautiful base for your Epic Easter Egg Smash Cake!
Epic Easter Egg Smash Cake
Ingredients You’ll Need:
For the Cake:
- 2 ½ cups all-purpose flour
- 2 ½ tsp baking powder
- ½ tsp salt
- 1 cup unsalted butter, softened
- 1 ¾ cups granulated sugar
- 4 large eggs
- 1 tbsp vanilla extract
- 1 cup whole milk
- Food coloring (various colors, for a colorful interior)
For the Filling and Coating:
- 3 cups heavy cream
- ½ cup powdered sugar
- 1 tsp vanilla extract
- 9-12 large pastel-colored candy-coated chocolate eggs (like Cadbury Mini Eggs, some to crush inside, some for decoration)
- White chocolate candy melts or white chocolate (to coat the outside)
- Assorted sprinkles (rainbow, small and large)
- Piping bag and tip for whipped cream decoration
How Much Time Will You Need?
This delightful cake takes about 30 minutes for preparation and roughly 30-35 minutes for baking, along with cooling time. You’ll want to allow extra time for constructing the cake and decorating it beautifully. Overall, expect to spend around 2-3 hours on this whimsical treat, depending on your decorating speed.
Step-by-Step Instructions:
1. Prepare the Cake Batter:
Preheat your oven to 350°F (175°C) and grease two 8-inch round cake pans with flour. In a bowl, whisk together the flour, baking powder, and salt. In a large mixing bowl, cream the softened butter and granulated sugar until it’s light and fluffy. Then, add in the eggs one at a time, mixing well after each addition. Stir in the vanilla extract. Next, start adding the flour mixture and the whole milk alternately, beginning and ending with the flour. Mix just until everything is combined.
Now, divide your colorful batter into several small bowls. Tint each with a different food coloring. Spoon in the colors alternately into your prepared cake pans, swirling slightly to create a marbled effect. Bake for 30-35 minutes, or until a toothpick comes out clean. Let the cakes cool completely in the pans on a wire rack.
2. Prepare Whipped Cream:
In a mixing bowl, whip the heavy cream, powdered sugar, and vanilla extract together until stiff peaks form. Once done, place it in the refrigerator to chill until you’re ready to use it.
3. Build the Cake:
Once the cakes are cool, level the tops with a serrated knife. Place one cake layer on your serving plate and generously spread whipped cream over it. Crush a handful of candy-coated eggs and sprinkle them into the whipped cream for added color and crunch. Place the second cake layer on top. Using a serrated knife, carefully carve a hollow dome shape in the center of the cake to create a cavity.
4. Fill the Hollow Center:
Now, fill the hollow cavity with more whipped cream, pressing in small candy eggs and adding pastel crumbled cake bits. A few sprinkles can be tossed in for extra fun!
5. Coat the Cake Dome:
Melt the white chocolate or candy melts as per package instructions. Pour or spread the melted chocolate evenly around the outside of the cake to form a smooth shell. Let it set completely, refrigerating if necessary.
6. Decorate the Top:
Using a piping bag fitted with a star tip, pipe rosettes of whipped cream around the top of the dome. Place whole pastel chocolate eggs on each rosette and sprinkle extra colorful sprinkles over the top if you like. Drizzle colored frosting for an extra pop!
7. Serve and Smash:
Before serving, allow the cake to come to room temperature slightly. At the party, it’s time for the fun! Smash the cake dome to reveal the colorful candy and cream-filled interior! Enjoy your enchanting Epic Easter Egg Smash Cake!
Can I Use Different Types of Flour?
Absolutely! While this recipe calls for all-purpose flour, you can use cake flour for a lighter texture or a gluten-free flour blend if you need a gluten-free option. Just note that the final texture might vary a bit.
How Should I Store Leftover Cake?
Store any leftover cake in an airtight container in the refrigerator for up to 3 days. If you’d like to keep it longer, you can freeze it. Wrap slices tightly in plastic wrap and place them in a freezer bag for up to 3 months. Just thaw in the fridge before serving!
Can I Make the Cake Layers in Advance?
Yes, you can! Bake the cake layers up to 2 days in advance. Allow them to cool completely, then wrap each layer tightly in plastic wrap and store them in the fridge until you’re ready to assemble the cake.
What If I Don’t Have Heavy Cream?
If you don’t have heavy cream, you can substitute it with a mixture of milk and butter (3/4 cup milk with 1/4 cup melted butter) for a similar richness. However, it might not whip up as stiff as heavy cream.