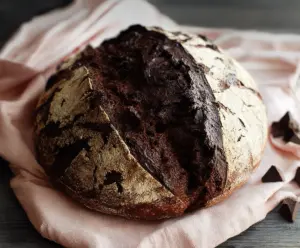
This Chocolate Sourdough Discard Bread is a tasty way to use that leftover sourdough starter! It combines rich chocolate with a soft, chewy texture that will make your taste buds dance.
Who can resist a slice of this yummy bread? I love to spread a little butter on it—perfect for a snack or dessert! Plus, it’s a fun way to use up your sourdough starter, so no waste!
Key Ingredients & Substitutions
Sourdough Discard: This is the star of the show! Using active sourdough discard adds flavor and helps the bread rise. If you don’t have sourdough starter, you can use a store-bought yeast bread recipe instead, but it won’t have the same tangy flavor.
All-Purpose Flour: This is your main flour. If you want a whole grain option, you can mix in whole wheat flour, but be aware that it might alter the texture slightly. I often mix both for a nuttier flavor.
Cocoa Powder: Unsweetened cocoa powder gives the bread its chocolate flavor. If you prefer a sweeter bread, consider using Dutch-processed cocoa for a milder taste, though it will affect the color.
Dark Chocolate Chips: I love using semi-sweet or dark chocolate chunks for a richer experience. If you want to reduce sugar, try using sugar-free chocolate chips. White chocolate chunks can also be tasty in this bread for a different twist!
How Do I Get My Dough to Rise Perfectly?
Getting a good rise in dough is crucial for fluffy bread. Here’s what to consider:
- Make sure your sourdough discard is active. It should bubble and smell slightly tangy. If it doesn’t, your bread might not rise well.
- Keep your dough in a warm, draft-free spot, ideally around 75-80°F (24-27°C). If it’s too cold, the yeast will be sluggish.
- Let the dough rise until it becomes puffy, not just doubled. This can take longer in colder temperatures.
After shaping, giving it a second proof allows the gluten to relax, ensuring a better texture when baked. Just be patient, and you’ll be rewarded with a fantastic rise!
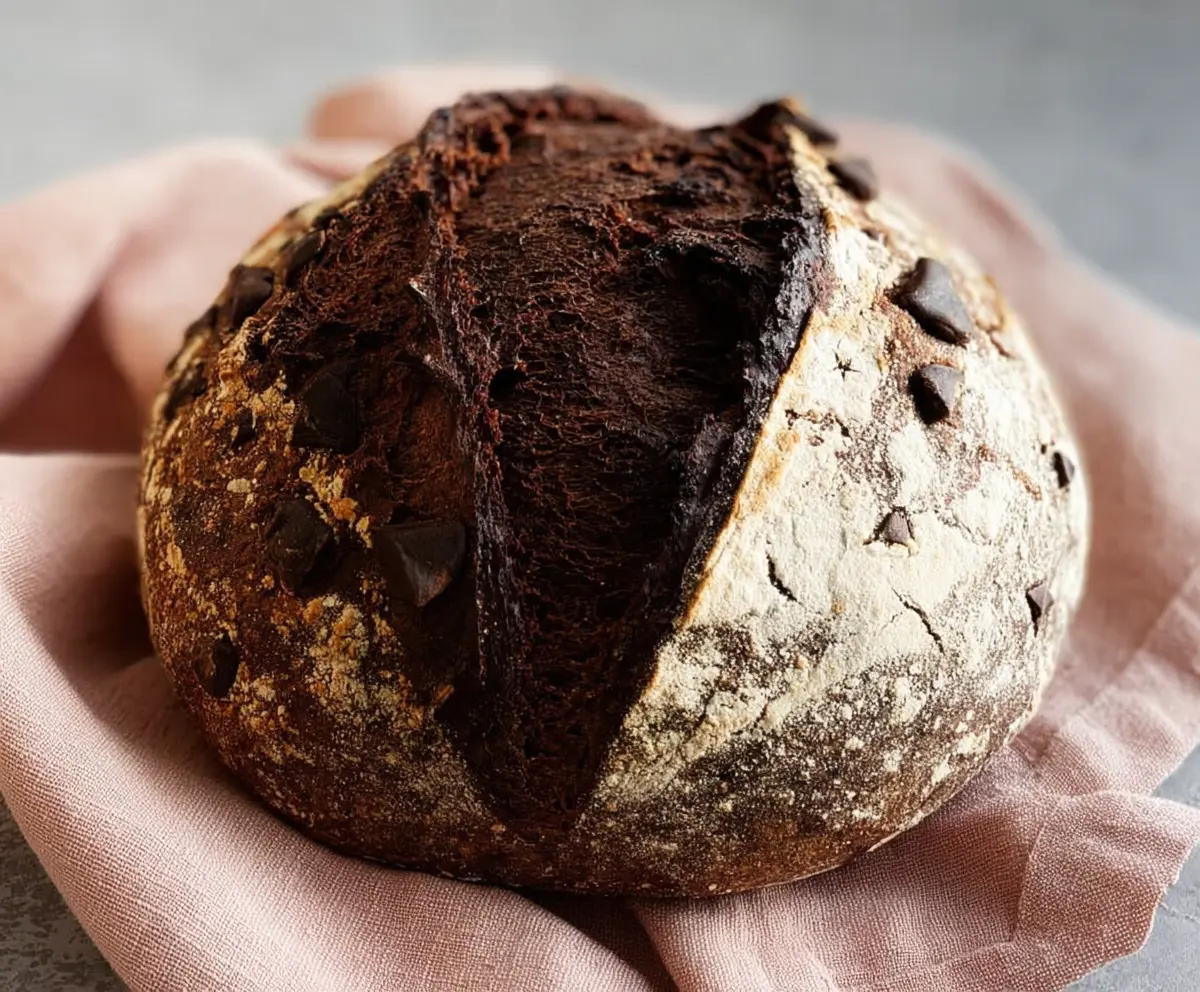
Chocolate Sourdough Discard Bread
Ingredients You’ll Need:
- 1 cup (240g) active sourdough discard (unfed starter)
- 2 ½ cups (320g) all-purpose flour
- ⅓ cup (30g) unsweetened cocoa powder
- ¾ cup (180ml) warm water (about 80°F/27°C)
- 1 tsp salt
- 2 tbsp sugar or honey
- 1 tsp instant yeast (optional, to aid rise)
- ½ cup (90g) dark chocolate chunks or chips
How Much Time Will You Need?
This recipe takes about 15 minutes for preparation, 3-4 hours for the first rise, 1-2 hours for the second proof, and baking time is around 40-45 minutes. So, plan for some time, but the wait is completely worth it for this delicious bread!
Step-by-Step Instructions:
1. Mixing the Ingredients:
In a large bowl, mix together the sourdough discard, warm water, and sugar or honey until everything is well combined. This will create a nice base for your dough.
2. Adding Dry Ingredients:
Next, add the flour, cocoa powder, salt, and instant yeast (if you’re using it) into the mixture. Stir until it forms a shaggy dough. Don’t worry if it looks messy at first; it will come together!
3. Kneading the Dough:
Turn the dough out onto a lightly floured surface. Knead it for about 8-10 minutes until it becomes smooth and slightly elastic. If it feels a bit sticky, you can sprinkle a little more flour, but be careful not to add too much.
4. Folding in the Chocolate:
Now, gently fold in the dark chocolate chunks until they are evenly distributed throughout the dough. This part is where the chocolatey magic happens!
5. First Rise:
Place the dough in a lightly oiled bowl, cover it with a damp cloth or some plastic wrap, and let it rise at room temperature for 3-4 hours, or until it’s nearly doubled in size. This helps develop flavor and texture.
6. Shaping the Dough:
After it has risen, carefully deflate the dough to remove excess air. Shape it into a round boule. Dust a proofing basket or bowl with flour and place the dough seam-side up. Cover it again, and let it proof for another 1-2 hours until puffy.
7. Preheating the Oven:
While your dough is proofing, preheat your oven to 450°F (230°C). Place a Dutch oven or heavy covered pot inside to heat up. This helps create a crispy crust.
8. Preparing for Baking:
Carefully transfer the dough onto a sheet of parchment paper. Use a sharp knife or razor blade to score the top of the dough—this will help it expand while baking.
9. Baking the Bread:
Remove the hot Dutch oven from the oven. Place the dough with the parchment paper inside, cover it, and bake for 20 minutes. This initial covered baking is crucial for a good rise.
10. Finishing the Bake:
After 20 minutes, remove the lid and continue baking for an additional 20-25 minutes, or until the crust is deep brown and crispy. The aroma will fill your kitchen!
11. Cooling:
Once done, let the bread cool completely on a wire rack before slicing. This step is important to set the texture, making it easier to slice later.
Enjoy your rich, chocolatey sourdough bread as a delightful snack or dessert! It’s perfect with a bit of butter or on its own. Happy baking!
Can I Use More Cocoa Powder for a Richer Flavor?
Absolutely! You can increase the cocoa powder to ½ cup if you want an even richer chocolate flavor, but keep in mind that this may slightly affect the texture and moisture of the bread. You might want to reduce the flour by a couple of tablespoons to compensate.
What If My Sourdough Discard Isn’t Active?
If your sourdough discard isn’t bubbly or active, it might not help the dough rise effectively. In that case, try feeding your starter and waiting until it is bubbly before making the recipe. Alternatively, you could use a bit more instant yeast for assurance.
How to Store Leftover Bread?
Store any leftover bread in an airtight container or wrapped in plastic at room temperature for up to 3 days. For longer storage, slice the bread and freeze it, placing parchment paper between slices to make it easy to thaw individual pieces later!
Can I Make This Recipe Gluten-Free?
Yes, you can make a gluten-free version! Use a 1:1 gluten-free all-purpose flour blend in place of the all-purpose flour. Make sure it has xanthan gum for proper texture, as this helps replicate gluten’s elasticity.